Facebook Ads Best Practices for Beginners (2024)
31 May, 2024
Discover the best practices for Facebook Ads in 2024 with our comprehensive beginner’s guide! Learn how to set up your campaigns, optimize ad creatives, and leverage tools like Facebook Pixel and Conversion API to maximize your ad performance.
Jump to:
Hop on our weekly newsletter train! We're sharing tips so stellar, we're practically job-threatening ourselves!
If you've just begun dabbling in Facebook Ads and are feeling a bit like Alice tumbling down the rabbit hole, fear not. Facebook has countless features, settings, and options that are designed to turbo-charge your business. It can be a marketer's dream...or nightmare—if you aren't sure how to use it. In this post, we are going to cover the best practices to get you up and running with Facebook Ads in no time. We’ll keep it light, fun, and totally doable. Ready? Let’s get started! 🚀
Set Up Your Facebook Pixel
Before you dive into the deep end of Facebook advertising, setting up your Facebook Pixel and Conversion API is crucial. These tools are like the backstage crew at a rock concert—they make sure everything runs smoothly and give you the data you need to make informed decisions.
What is Facebook Pixel? 📏
The Facebook Pixel is a small piece of code you place on your website to track visitor actions. It helps you measure the effectiveness of your ads by understanding what people do on your site. Think of it as your marketing spy, providing insights into user behavior that can help you optimize your ad strategy.
What is the Conversion API? 🔌
The Conversion API works alongside the Pixel to ensure you capture every bit of conversion data, even if your Pixel has trouble tracking due to browser restrictions. It sends conversion data directly from your server to Facebook, ensuring more accurate tracking.
Setting Up Your Facebook Pixel
1. Create Your Pixel
Navigate to Events Manager: Go to your Facebook Business account, tools, and select Events Manager.
;![GatsbyImage]()
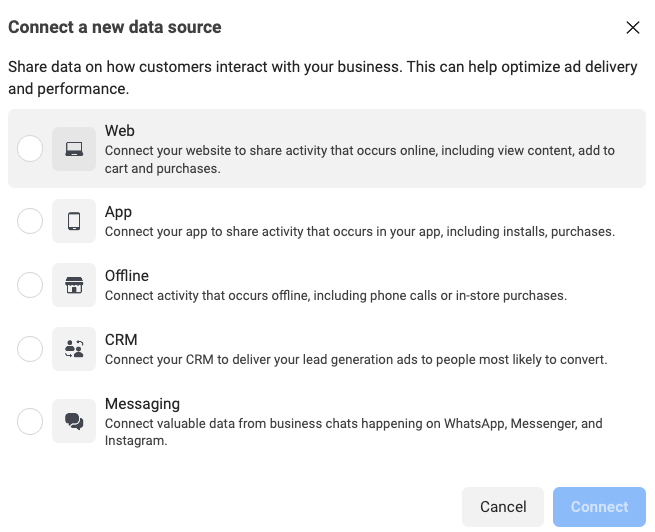
Create a Pixel: Click “Connect Data Sources” (the big green button in the left panel) and select “Web,” then click “Connect.”
;![GatsbyImage]()
Name Your Pixel: Give your Pixel a name and enter your website URL to check for easy setup options.
2. Add the Pixel to Your Website
Manually Add Pixel Code: Copy the Pixel base code and paste it into the header section of your website’s HTML. If you’re using a platform like WordPress, there are plugins available to make this easier.
Use a Partner Integration: If you’re using platforms like Shopify or Squarespace, follow the guided instructions to add the Pixel without manually handling the code.
Pro Tip: Test your Pixel to ensure it’s working correctly by using Facebook’s Pixel Helper Chrome extension.
Setting Up the Conversion API
1. Access Events Manager
Navigate to Events Manager: Like with the Pixel, go to your Facebook Business account and select Events Manager.
2. Connect the Conversion API
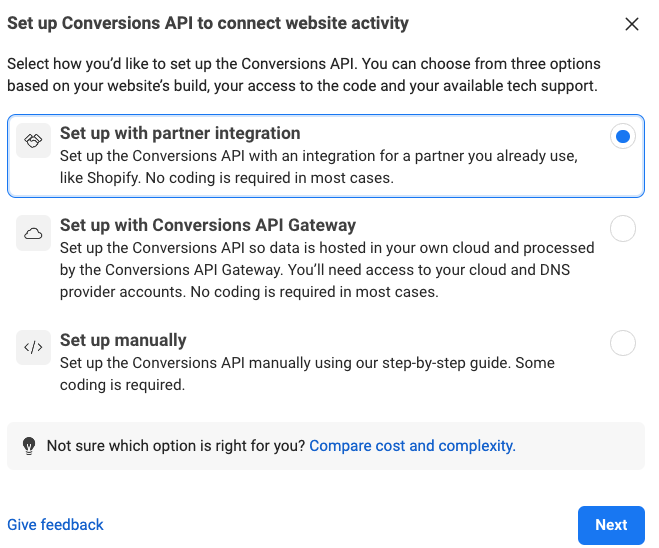
Select Data Source: Click on “Add Events” and select “Using the Conversions API.” If you have not set this up yet, there will be a big banner under "recommended tasks" with a big, blue "Get Started" button. You'll want to click that.
Choose a Setup Option: You can either set it up through a partner integration (e.g., Shopify, WooCommerce) or manually. If you don't see your website or app partner available, you can configure just about anything to send to the conversions API without code using Zapier. Follow Facebook's instructions on how to do this. Alternatively, if you are technical, you can follow Facebook's instructions to add the tracking code to your website. Although, this is more time consuming than using one of the intergrations.
;![GatsbyImage]()
Why You Need Both
Using both the Facebook Pixel and Conversion API ensures you have robust, accurate data collection. The Pixel is great for tracking standard events on your website, while the Conversion API captures server-side events, giving you a more comprehensive view of your user’s journey.
Best Practices for Setting Up Your Facebook Ads Campaigns
1. Defining Your Objective 🎯
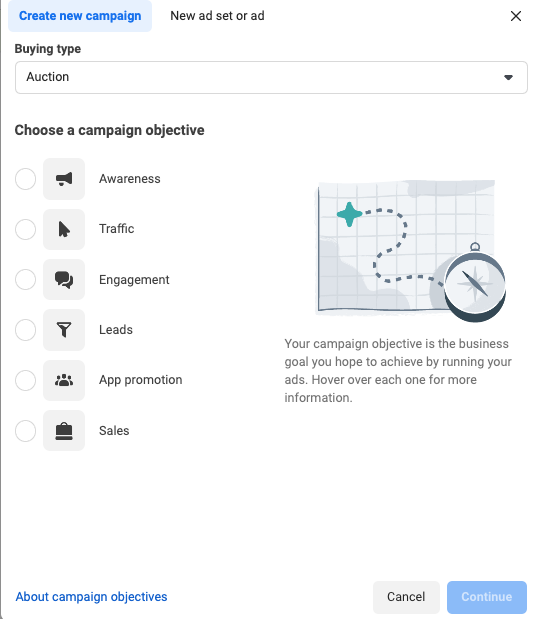
Before you even touch that “Create” button, you need to know what you want to achieve. Facebook offers several objectives like brand awareness, traffic, engagement, app installs, video views, lead generation, and conversions. Picking the right one is crucial—the Facebook ads algorithm is going to vary considerably based on what you choose. So if you select "leads" and are going for sales, you probably aren't going to see the results you're looking for.
Pro Tip: Align your ad objective with your business goals. Want sales? Go for conversions. Just looking for some attention? Awareness is your buddy (although, as a beginner marketer, we generally suggest working with more action-oriented campaigns).
2. Creating Your Campaign 🛠️
Once you’ve set your objective, it’s time to jump into the Ads Manager. Here’s how:
Navigate to Ads Manager: From your Facebook Business page, head to Ad Center and click on Ads Manager.
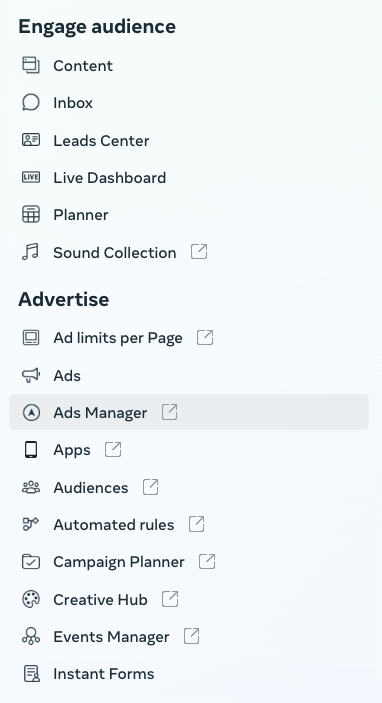
Create Your Campaign: Click on the green shiny "Create" button in the top left
Choose Your Objective: Pick the objective that you decided on above. You'll want to keep buying type set on "Auction"
Name Your Campaign: Be specific and clear. “Advantage+ | Sales | Spring Sale 2024” beats “Campaign 1” any day. Usually, it's a good idea to specify the objective and bidding model, so you can compare performance between campaigns and easily understand what the settings were.
3. Choose Your Target Audience 👥
Audience targeting is where Facebook Ads really shine. Below are some of the audience-targeting settings you have at your disposal. The way these audiences are presented in the interface may differ slightly based on the objective you select for your campaign.
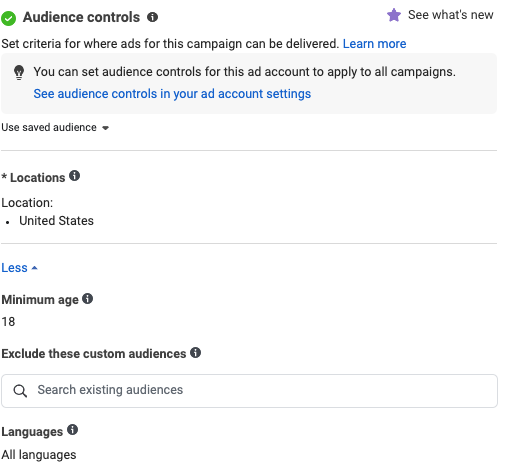
Audience Controls: Define your audience based on demographics, location, and language. You can also exclude custom audiences from your campaign. For example, if you are running a new customer prospecting campaign, you may want to exclude existing customers.
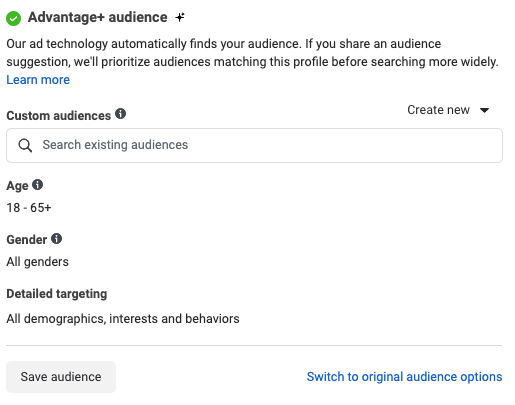
Avantage+ Audience: This is what this section is now called, and is where you can add more advanced audience targeting to your campaign. By default, this will be set to "Advantage + targeting," which means that Meta will use its own algorithm to find audiences most likely to act on your goal. When this is enabled, these core audience configurations act more as "suggestions" to the bidding model. Basically, giving it a starting point.
;![GatsbyImage]()
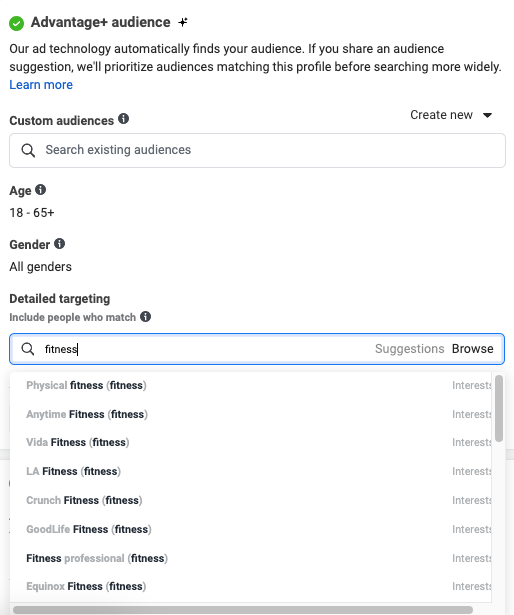
We have found the advantage+ audience targeting to be very effective when you add broad audience targeting suggestions or custom audiences. For instance, if you are advertising a local gym, it's usually sufficient to add general "Fitness" or "weight loss" suggestions. In our testing, we have found more specific suggestions to be less effective. You can add these types of audience suggestions by clicking on "edit" next to detailed targeting.
;![GatsbyImage]()
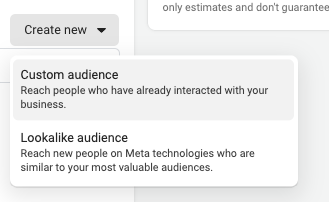
We also have found that layering in custom audiences (e.g. customer lookalikes) to the Advantage+ targeting works well. You can do this by clicking into your cusotm audiences and selecting it. If you haven't created one yet, you can click "create new" next to the custom audiences section and configure it there. We will touch more on custom audiences in second.
;![GatsbyImage]()
Note: You can also disable advantage+ targeting if you want the campaign to only target audiences you define. This is effecitve if you are specifically wanting to re-market to users who visited your site, upsell existing customers, or something similar. You can find this option in the bottom right of this section.
;![GatsbyImage]()
Custom Audiences: We mentioned custom audiences above; these are people who have already interacted with your brand. They could have visited the website, engaged with your ad, watched a video, followed you on social media, or made a purchase. These are extremely effective for refining targeting and creating lookalike audiences, which we will touch on next. To create a custom audience, you can either go to your audience manager or do it while you are setting up the campaign. For the sake of efficiency, we will do it inside the campaign setup module.
Next to "Custom Audiences" under the Advantage+ Audience section, select "Create new," "Custom Audiences"
Select the source you'd like to use. This will vary largely based on what you are trying to achieve. So long as you have the pixel set up, you can select website (or app). You can also set one up based on whether they filled out a Facebook lead form, interacted with a video, engaged with your Instagram account or Facebook page, etc. Some of these won't apply unless you have a catalog set up. See our article: How to set up a Facebook Catalog.
After you've selected your source, you can create audiences based on the events you are receiving from that source. It's usually a good idea to segment this event by duration. For instance, if you're creating a "website visitor" audience, you may want to do a 30-day audience, a 7-day audience, a 1-day audience, etc. as all of these will indicate a different level of intent.
Lookalike Audiences: Find people similar to your best customers. It’s like cloning, but legal and way less creepy. (You set these up by going to custom audiences -> "create new." Note, you need to have a custom audience that you want to create a lookalike of first—usually, this will be purchasers, lead submitters, engaged website visitors, etc.) Once you have a custom audience, you'll select it from the list and specify how closely this audience should resemble. Usually, it's best to start with a 1%, and expand if you need to.
Crafting Your Ad
4. Design Eye-Catching Creatives 🎨
Your ad’s creative is what grabs attention. Do not neglect this. We've seen various different ad formats perform, depending on many factors, so we suggest starting with whatever assets are easiest for you to access or create. You can always add in different ad types later and see how they work
Image Ads: Use high-quality, clear images. No one likes pixelated pics.
Video Ads: Keep them short and engaging. Remember, the first few seconds are crucial—don’t bore people with a slow start.
Carousel Ads: Show off multiple images or videos in a single ad. It’s like a digital carousel ride, but without the dizziness.
Pro Tip: Follow Facebook’s ad specs to ensure your creatives display correctly. Nothing worse than an ad that looks like it’s been through a blender.
5. Write Compelling Copy ✍️
Your ad copy needs to be concise, compelling, and aligned with your visuals. Include a clear call-to-action (CTA) that tells people exactly what to do next—no guessing games here! After you write the first variation, Meta will suggest other variations of copy using AI and the information you provided in your first example. You can select from these by using the checkboxes or continue to write your own.
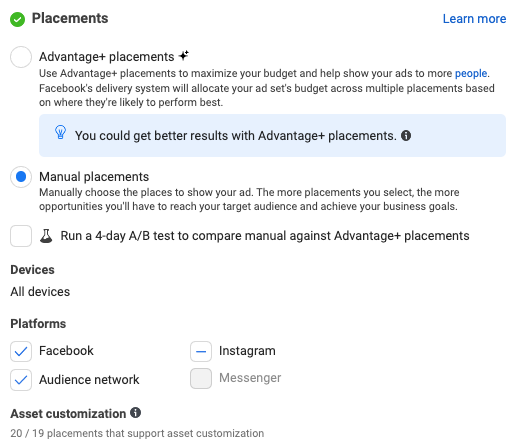
6. Optimize Ad Placements 📲
Facebook offers automatic placements to maximize your ad delivery, but you can also choose manual placements if you’re a control freak (no judgment!).
Feeds: Facebook and Instagram feeds.
Stories: Vertical ads that appear between stories.
In-stream: Ads that appear in videos.
Search: Ads in Facebook search results.
Messages: Ads in Facebook Messenger.
Pro Tip: If you're just getting started, you can try Advantage+ and see what placements are performing but generally, we find that manual placements with Messenger and Audience Network disabled perform very well. Facebook offers an easy option to split test this for yourself, also.
Running and Monitoring Your Ads
7. Setting Your Budget and Schedule 💸
You can set a daily or lifetime budget for your ad campaigns. A daily budget sets the average amount you’re willing to spend per day, while a lifetime budget is the total amount you’re willing to spend over the entire campaign duration.
Pro Tip: Start with around $20 a day to get meaningful data and test different ad creatives and audiences. Once you find what works, you can scale up your spending faster than a caffeinated cheetah.
8. Monitoring Performance Metrics 📊
Once your ad is live, keep an eye on its performance. Key metrics to track include:
Reach: The number of people who saw your ad.
Engagement: Actions like likes, comments, and shares.
Click-Through Rate (CTR): The percentage of people who clicked on your ad.
Conversion Rate: The percentage of people who completed the desired action.
CPA: How much you are paying for your desired action
9. A/B Testing 🔄
Testing different versions of your ads helps you determine what resonates best with your audience. Experiment with various headlines, images, copy, and CTAs.
Pro Tip: Test one element at a time to accurately measure its impact on ad performance.
10. Optimize Based on Data 📈
Use the data collected from your ad performance to make informed decisions. Adjust your targeting, creative, and budget based on what’s working and what’s not.
Pro Tip: Regularly review your campaigns and make small, incremental changes rather than large, sweeping adjustments.
Conclusion
And there you have it—a crash course in Facebook ads best practices for beginners! 🎉 By defining your objectives, crafting compelling creatives, targeting the right audience, and continuously optimizing based on performance data, you’ll be well on your way to Facebook ad success. Remember, the key to success is to stay adaptable and keep learning.
Ready to take your Facebook advertising to the next level? Get a free marketing plan from DriftLead and start optimizing your ad strategy today! Let’s make your Facebook ads work harder and smarter for your business. 🚀
