How to Use Facebook Ads for E-commerce Businesses
09 Nov, 2023
Maximize your e-commerce success with our comprehensive guide on Facebook Ads. Learn about Advantage+ shopping, Meta Commerce, retargeting strategies, and more. Get expert tips and a free marketing plan to boost your sales.
Jump to:
Hop on our weekly newsletter train! We're sharing tips so stellar, we're practically job-threatening ourselves!
In the digital bazaar where social media meets e-commerce, Facebook stands out not just as a bustling marketplace but as a potent tool for connecting products with potential buyers. For e-commerce businesses, mastering Facebook ads isn't just a savvy move—it's akin to unlocking a treasure chest of sales opportunities. Whether you're a fledgling startup or an established online store, leveraging the platform's rich tapestry of ad campaigns can transform window-shoppers into loyal customers and clicks into conversions. In this guide, we'll walk you through the Facebook campaigns that are not just designed for e-commerce but are tailored to elevate your brand from being just another digital storefront to becoming a household name. Let the journey to amplified online sales begin.
Pre-Requisites for E-Commerce Campaigns
Before diving into the world of Facebook advertising, e-commerce businesses need to ensure they have all the elements in place for a successful campaign. Here’s what you need to have ready:
1. Facebook Business Page: Your brand's presence on Facebook starts with a Business Page. It’s a prerequisite for creating ads and should embody your brand's image, voice, and style.
2. Facebook Ad Account: Set up an ad account in Facebook’s Ads Manager. This is where you’ll manage your campaigns, set budgets, and analyze results.
3. Product Catalog: Have a product catalog uploaded to Facebook’s Commerce Manager. This is a digital storefront for your products, enabling features like dynamic ads that automatically showcase relevant items to customers.
4. Pixel Implementation: Install the Facebook Pixel on your website. This tiny piece of code is crucial for tracking user behavior, measuring the effectiveness of your ads, and retargeting potential customers.
5. Set up the Conversion API for enhanced tracking: In addition to the pixel, you'll also want to set up Meta's conversion API so you can directly communicate from your website server back to Facebook ad get more reliable tracking.
E-commerce Specific Campaigns on Facebook
Within this space, Meta’s Advantage+ shopping campaigns and manual sales campaigns emerge as two distinct paths with unique benefits and approaches.
Advantage+ Shopping Campaigns:
Advantage+ shopping campaigns harness Meta's machine learning technology to streamline the advertising process, aiming to deliver high performance with greater efficiency. This is particularly beneficial for performance-focused advertisers who aim to drive online sales. Here’s what sets Advantage+ apart:
Streamlined Efficiency: These campaigns require fewer inputs during setup, allowing for a faster launch with less manual tinkering.
Consolidated Audiences: Instead of juggling multiple campaigns for prospecting and retargeting, Advantage+ combines these audiences, serving personalized product recommendations from your catalog.
Machine Learning Precision: With minimal input, Meta’s machine learning targets your highest-value customers across its platforms, optimizing your ad spend.
Simplified Management: Run up to eight campaigns per country, reducing the complexity of campaign management and the need for frequent adjustments.
Creative Optimization: Advantage+ can test up to 150 creative combinations, automatically pushing the best-performing ads to the most relevant shoppers.
As a quick disclaimer, as with any machine learning model, the success of these campaigns relies on the data at its disposal, so if you have a brand new campaign without a ton of data or are working with a small budget, you may be better off starting with a manual sales campaign.
Manual Sales Campaigns:
Traditional manual sales campaigns offer granular control over every aspect of your Facebook ads. This control allows for:
Detailed Customization: Advertisers can tweak every element, from targeting options to creative elements, ensuring that each campaign is finely tuned to the audience.
Hands-On Optimization: Continuous management and adjustments are possible, allowing advertisers to respond to campaign data in real time.
Targeted Approaches: You can create specific campaigns for different segments, products, or objectives, allowing for tailored strategies that cater to distinct goals.
While Advantage+ shopping campaigns leverage automation to reduce the hands-on effort, they also allow advertisers to cast a wider net with fewer campaigns. In contrast, manual campaigns demand more attention but offer precise control, making them suitable for advertisers who enjoy deep dives into data and hands-on optimization.
Setting Up the Meta Pixel
The Meta Pixel, formerly the Facebook Pixel, is a critical piece of code for any e-commerce business using Facebook ads. It lets you measure, optimize, and build audiences for your advertising campaigns. Here's a step-by-step guide on setting it up:
1. Create Your Meta Pixel:
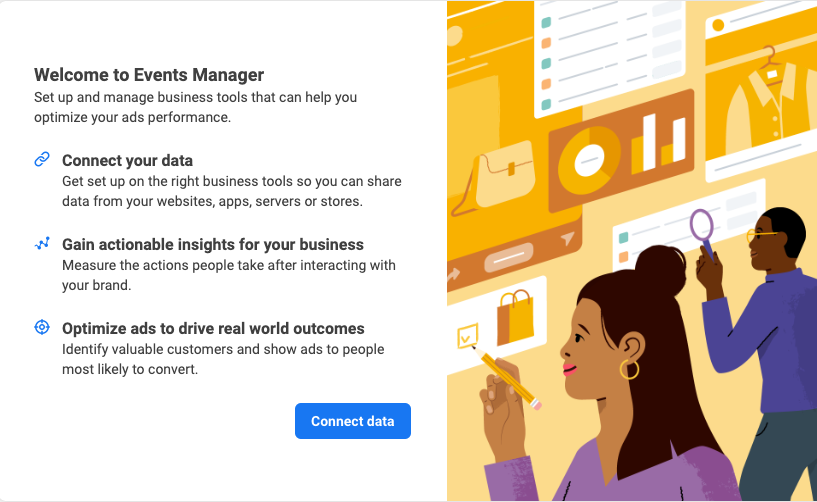
Navigate to the 'Events Manager' in your Facebook Ads Manager.
Click on the ‘Connect Data Sources’ and select ‘Web’.
Choose ‘Meta Pixel’ and click on ‘Connect’.
Enter a name for your pixel and your website URL to check for easy setup options.
2. Install the Pixel Code on Your Website:
You'll be given a piece of code to install on your website. If you’re not familiar with HTML, you might need the help of a developer.
For platforms like Shopify, WooCommerce, or Wix, some integrations allow you to simply paste your Pixel ID into the platform's settings without dealing with code.
3. Verify Your Pixel Installation:
Use the ‘Send Test Traffic’ feature after installing the Pixel code to ensure it’s firing correctly.
You can also use the Facebook Pixel Helper, a Chrome extension, for troubleshooting and confirming the Pixel is active.
4. Set Up Conversion Tracking:
Decide which events are important for your e-commerce site. Standard events include actions like ‘Purchase’, ‘Add to Cart’, and ‘View Content’.
You can set up events directly through the code or use the Event Setup Tool within the Events Manager.
5. Add Event Parameters:
For e-commerce, you’ll want to capture details such as the value of a purchase or the type of content viewed.
Customize events with additional parameters to collect more detailed information.
6. Activate Advanced Matching:
This feature lets you send additional customer data through the Pixel to match more website actions to Facebook users, improving attribution and audience targeting.
7. Test Your Events:
After setting up events and parameters, use the ‘Test Events’ section in the Events Manager to ensure all data is being sent correctly.
8. Monitor Pixel Performance:
Regularly check the Pixel’s performance and the data it collects. This will help you fine-tune your e-commerce campaigns.
Setting Up Your Product Catalog
1. Access the Commerce Manager:
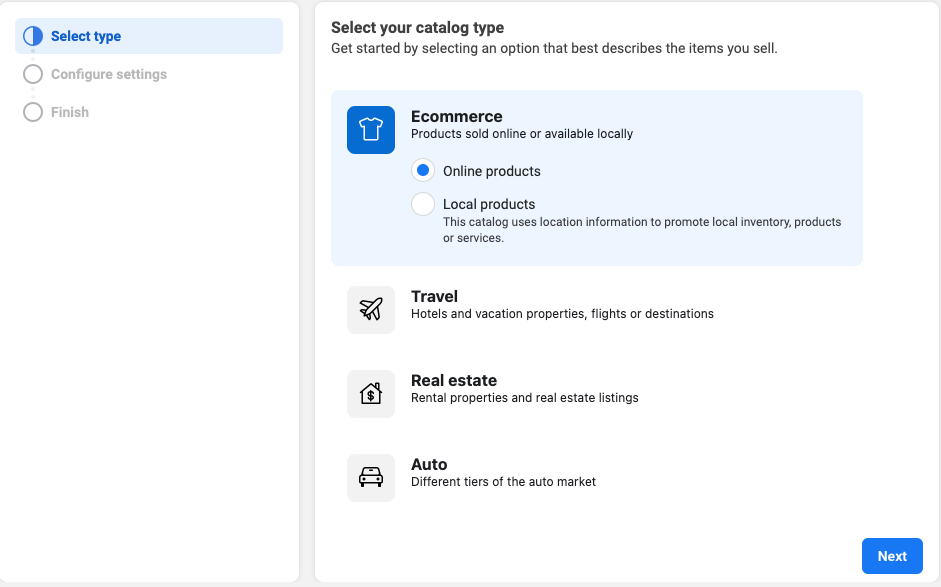
Go to Facebook’s Commerce Manager and choose 'Create a Catalog'.
Select 'E-commerce' as your catalog type if you sell physical products.
2. Choose the Catalog Owner:
Select the business account that will own the catalog. This should be the same as your ad account for ease of use.
3. Add Your Product Inventory:
You can manually add products if your inventory is small.
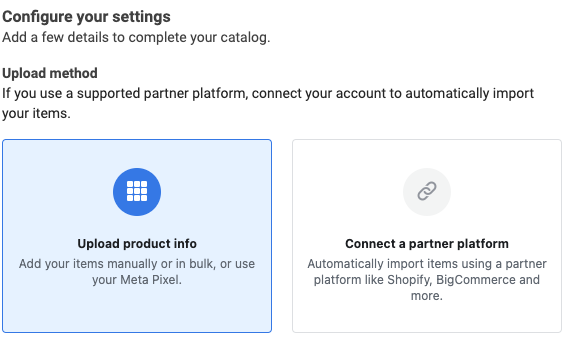
For larger inventories, use bulk upload with a data feed file or integrate with an e-commerce platform like Shopify or WooCommerce that can automatically sync your products.
Ensure your product images, descriptions, prices, and URLs are accurate and up-to-date.
4. Set Up Data Feed:
If you’re using a data feed, you’ll need to provide details for how Facebook can access this feed. You can upload it, fetch it from a URL, or use a Facebook partner integration.
Schedule regular updates to ensure your catalog reflects your current inventory, including any new products, out-of-stock items, or price changes.
5. Organize with Product Sets:
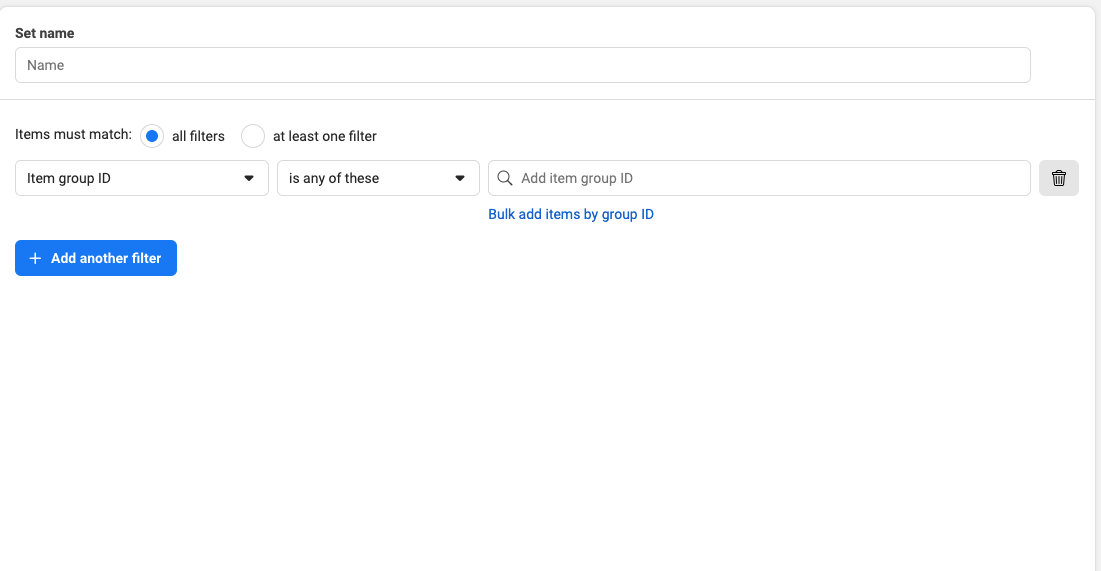
Create sets within your catalog for different categories, such as 'Best Sellers' or 'Seasonal Products'. This will help you manage your products and create more targeted campaigns. The easiest way to do this is by filtering your products based on certain attributes, but you can manually add products to sets as well
6. Optimize Product Details:
Use high-quality images and detailed descriptions to make your products stand out.
Ensure each product has the necessary attributes like price, availability, and condition.
7. Link Your Catalog to Your Pixel:
Connect your Meta Pixel (or server events from the Conversions API) to your catalog. This allows for dynamic ad campaigns that can automatically show users products they’ve interacted with or might be interested in. You can access this in the "Events" section of the Commerce Manager.
8. Review and Publish:
Once you've added your products and organized your catalog, review everything to ensure accuracy.
Publish your catalog. It’s now ready to be used in your Facebook e-commerce campaigns.
9. Maintain Catalog Hygiene:
Regularly check your catalog for outdated items and update as needed to keep your ads relevant and engaging for customers. If you are directly integrated with your e-commerce platform—i.e, Shopify, for example, these catalog refreshes will happen automatically.
10. Leverage Catalog Insights:
Use the insights from your catalog’s performance to understand which products are performing well and optimize your inventory and ads accordingly.
A Bit About Meta Commerce Accounts
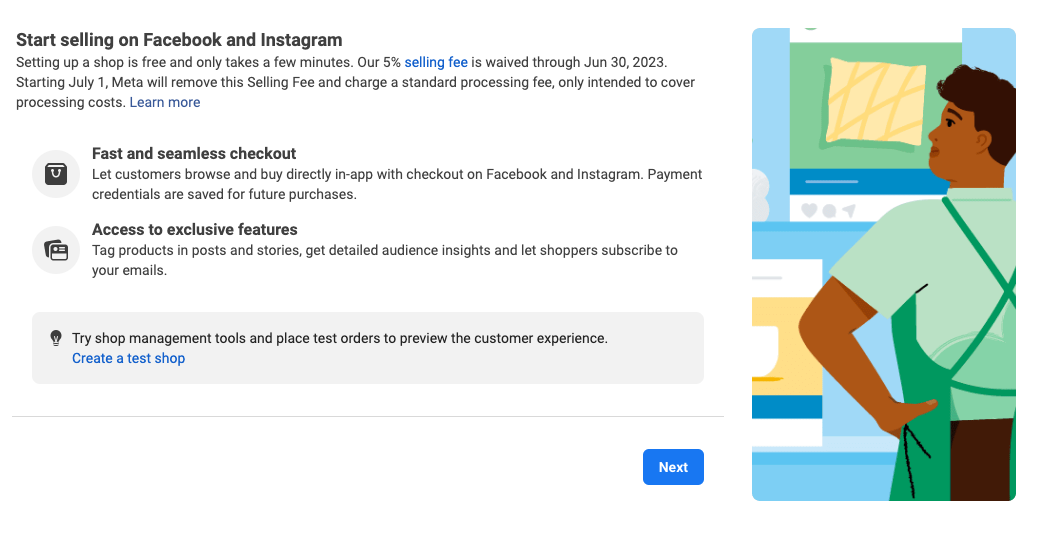
Meta now has Facebook and Instagram shops which allow users to purchase your products without leaving the Meta ecosystem. This gives users a streamlined and easier way to shop. To create a Facebook shop, you need ot set up a Meta Commerce Account.
What Are Meta Commerce Accounts?
Meta Commerce Accounts are a centralized hub for businesses to manage their shops across Facebook and Instagram. With this feature, businesses can upload their product catalog, manage inventory orders, and provide customer support all from one place and allow users to purchase your products from directly within Facebook.
The Benefits of Using a Meta Commerce Account:
Unified Inventory Management:
Sync your product listings across all Meta platforms without the hassle of updating them separately for Facebook and Instagram.
Cross-Platform Insights:
Gain valuable insights into your customers’ shopping behavior and preferences across both platforms, enabling you to make data-driven decisions.
Streamlined Shop Experience:
Create and customize your shop once and have it reflected across both Facebook and Instagram, ensuring brand consistency and ease of shopping for customers.
Integrated Customer Support:
Handle customer queries, track orders, and resolve issues directly through your Meta Commerce Account, enhancing customer satisfaction.
Setting Up Your Meta Commerce Account:
To get started, you’ll need to:
Have a Facebook Business Page:
Your business must have an active Facebook Page as a prerequisite for setting up a Meta Commerce Account.
Meet Eligibility Requirements:
Ensure that your business complies with Meta’s commerce policies and is in a supported market.
Upload Your Product Catalog:
You can manually add products or use a data feed to import your entire inventory.
Configure Your Account Settings:
Customize your shop’s look, set up payment processing, and define shipping and return policies.
Link Your Accounts:
Connect your Instagram business profile to maximize your reach across both platforms.
How to Set Up Your Facebook and Instagram Shops
Setting up your Facebook and Instagram Shops through a Meta Commerce Account is a straightforward process designed to integrate your e-commerce offerings seamlessly on both platforms. Here’s a step-by-step guide to get you started:
Step 1: Access Your Meta Commerce Account
Log in to your Facebook Business Manager.
Navigate to 'Commerce Manager' and select or create the account you wish to use for your shop.
If you don't already have a Commerce Account, this is where you will need to set one up:
;![GatsbyImage]()
Step 2: Choose Your Sales Channels
Decide where you want to showcase your products. You can choose between Facebook, Instagram, or both.
Connect your business’s Facebook Page and Instagram profile to the Commerce Account.
Step 3: Create Your Shop
In the Commerce Manager, follow the prompts to set up your shop.
Add details about your business, like your website link and shipping options.
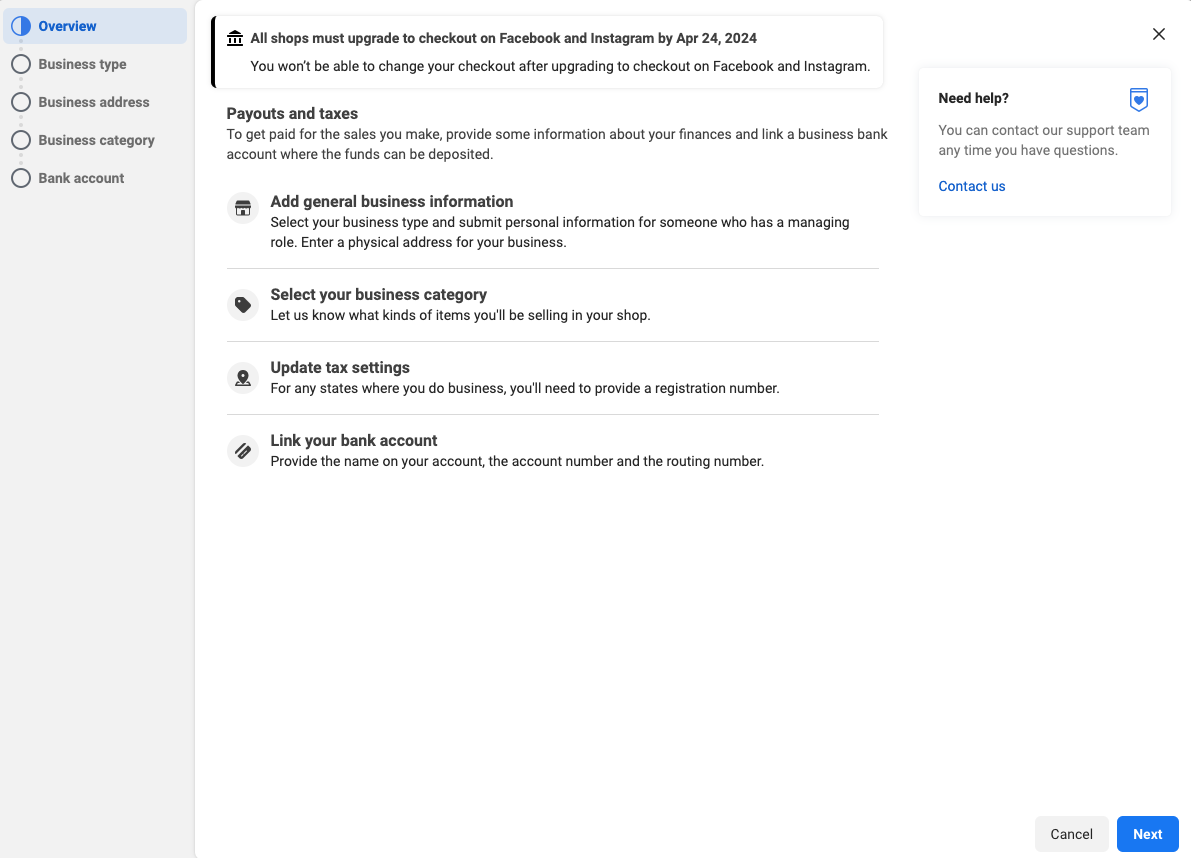
Step 4: Upload Your Product Catalog
Add products to your shop by uploading product images, descriptions, and prices.
You can upload products individually or in bulk using a spreadsheet or integrated e-commerce platform like Shopify.
Step 5: Customize Your Shop’s Appearance
Customize the look and feel of your shop to match your brand identity.
Arrange your products into collections for easy navigation.
Step 6: Submit Your Shop for Review
Before your shop goes live, Facebook will review it to ensure it meets all the commerce eligibility requirements.
This process can take a few days, so plan accordingly.
Step 7: Promote Your Shop
Once approved, announce your new Facebook and Instagram Shops to your followers.
Use posts, stories, and ads to drive traffic to your shop.
Step 8: Manage and Fulfill Orders
As orders come in, use the Commerce Manager to manage and fulfill them promptly.
Provide customer support and handle returns or exchanges as necessary.
Important Tips:
Ensure all images and descriptions are clear and accurate to prevent customer confusion or dissatisfaction.
Familiarize yourself with the Commerce Policies to avoid any compliance issues.
Engage with your customers through your shops to build a loyal community and encourage repeat business.
Optimizing Your Meta Commerce Experience:
Use high-quality images and detailed product descriptions to make your listings as attractive and informative as possible.
Leverage the full suite of advertising and promotional tools available within the Meta ecosystem to drive traffic to your shop.
Regularly update your inventory and utilize the insights provided by the platform to adjust your strategies and offerings.
Integrating With Your Existing E-commerce Ecosystem:Meta Commerce Accounts can be integrated with many e-commerce platforms like Shopify, WooCommerce, and BigCommerce, making it easier to sync your existing online store with your Meta shop.
The Benefits of Using a Meta Commerce Account:
Unified Inventory Management:
Sync your product listings across all Meta platforms without the hassle of updating them separately for Facebook and Instagram.
Cross-Platform Insights:
Gain valuable insights into your customers’ shopping behavior and preferences across both platforms, enabling you to make data-driven decisions.
Streamlined Shop Experience:
Create and customize your shop once and have it reflected across both Facebook and Instagram, ensuring brand consistency and ease of shopping for customers.
Integrated Customer Support:
Handle customer queries, track orders, and resolve issues directly through your Meta Commerce Account, enhancing customer satisfaction.
Types of Ads for Your Campaign
To harness the full potential of Facebook Ads for your e-commerce business, understanding the different ad formats that are designed to drive sales and engagement is crucial. Here are the key ad types tailored for e-commerce campaigns:
Dynamic Product Ads (DPAs):
What they are:
DPAs automatically promote your products to people who have expressed interest on your website, in your app, or elsewhere on the Internet.
Why use them:
They are highly effective for retargeting, as they show users products that they are already interested in, which can increase the likelihood of conversion.
How they work:
By utilizing your uploaded product catalog and Meta Pixel data, DPAs display specific product ads to users based on their past interactions with your website.
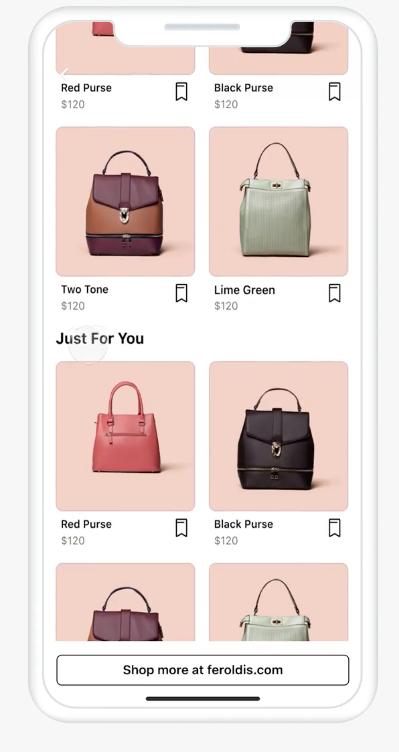
Collection Ads:
What they are:
Collection ads showcase multiple products under a primary video or image.
Why use them:
This format is designed to provide a seamless browsing experience for customers, allowing them to click and view multiple products without leaving Facebook.
How they work:
When someone taps on a collection ad, it expands into a full-screen Instant Experience (previously known as Canvas) where they can browse more products or learn more about the feature product.
Carousel Ads:
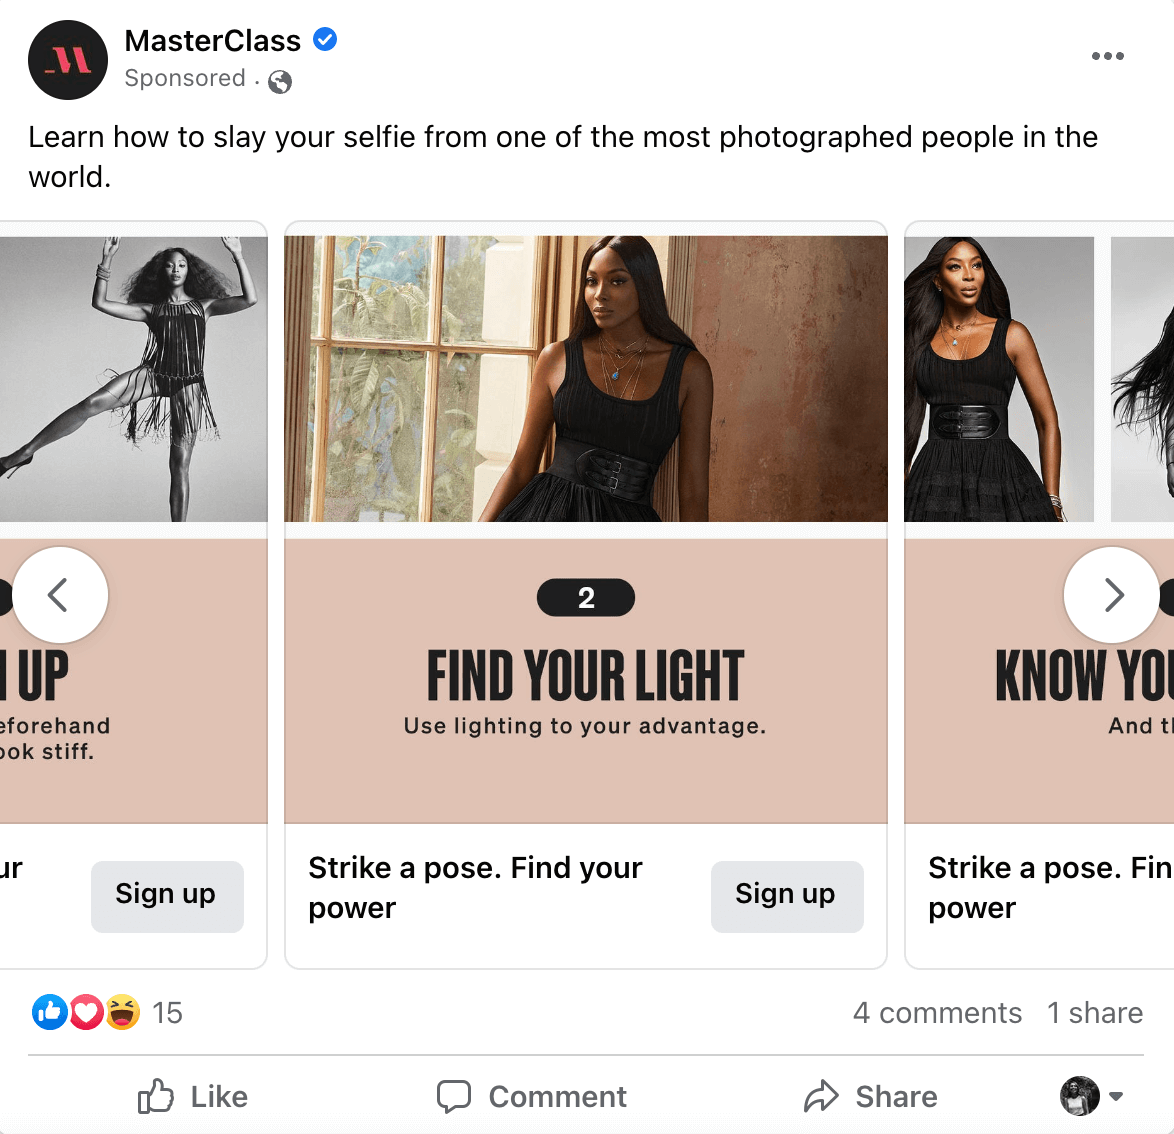
What they are:
Carousel ads allow you to showcase up to ten images or videos within a single ad, each with its own link.
Why use them:
They're perfect for highlighting different products, showcasing specific details about one product, or telling a story about your brand.
How they work:
Users can scroll through the carousel horizontally on their device, making it an interactive experience that can display various products from your catalog.
Video Ads:
What they are:
Video ads use moving images to capture users' attention more effectively than static images.
Why use them:
Videos can convey more complex messages about your brand or products and have been shown to engage users more than still images.
How they work:
They can be used in the feed, stories, or as in-stream ads in longer Facebook videos.
Slideshow Ads:
What they are:
Slideshow ads create a video-like experience with a series of still images.
Why use them:
They're an excellent alternative to video ads, especially if you have limited resources. They load quickly even on slow internet connections.
How they work:
These ads can tell a compelling story or feature multiple products through a sequence of images that play like a video.
Instant Experience Ads:
What they are:
Instant Experience is a full-screen ad experience that opens after someone interacts with your ad on a mobile device.
Why use them:
They can load up to 15 times faster than a mobile website outside of Facebook, which means a more seamless experience for the customer.
How they work:
You can use Instant Experiences to visually highlight your brand, products, or tell a story that engages your audience.

Each of these ad formats has its unique advantages, and using a mix of them can be particularly effective. Dynamic Product Ads are best for targeting specific segments of your audience with tailored products. Collection ads and Carousels are great for showcasing the breadth of your catalog, while Video and Slideshow ads can help tell your brand’s story or explain complex products. Instant Experience ads provide a rich, immersive environment to deeply engage users.
In your Facebook e-commerce campaigns, the key is to match your product and brand message with the right ad format to drive home your sales message and encourage immediate action from shoppers.
Retargeting Campaigns for Cart Abandonment
Cart abandonment is a common challenge for e-commerce businesses, where shoppers add items to their cart but leave the site without completing the purchase. Facebook makes it easy to use retargeting campaigns to bring these potential customers back to finalize their transactions. Here’s how to use Facebook ads for this purpose:
1. Identify Cart Abandoners: Using the Meta Pixel, you can track users who have added items to their cart but did not proceed to checkout. This data will be crucial for targeting your retargeting campaigns.
2. Segment Your Audience: Create specific audience segments within your Facebook Ads Manager for those who abandoned their carts. Consider segmenting further based on the time elapsed since the abandonment or the value of the items in the cart.
3. Craft Personalized Messages: Develop ad creatives that remind users of what they’ve left behind. Personalize messages to make them feel tailored to the individual, increasing the chances of recapturing their interest.
4. Offer Incentives: Consider offering a time-sensitive discount or free shipping to encourage users to complete their purchase. This can often be the nudge a potential customer needs to go through with the sale.
5. Use Dynamic Product Ads (DPAs): Dynamic Product Ads automatically show the exact items the user left in their cart. Ensure your product catalog is linked and up to date, as this makes DPAs an effective tool for cart abandonment campaigns.
6. Optimize for Conversions: Set your campaign's objective to 'Conversions' to signal to Facebook’s algorithm that your goal is to complete the sale. This helps optimize the delivery of your ads to users more likely to take action.
7. Test and Tweak: Regularly test different ad elements, like imagery, copy, and calls to action, to determine what resonates best with your audience. Use A/B testing to inform your decisions.
8. Monitor Frequency: Monitor how often your ads are being shown to the same users. Too much frequency can lead to ad fatigue and potentially irritate the user, causing the opposite of the desired effect.
9. Follow-Up with Email Campaigns: Integrate your retargeting strategy with email marketing. Send a follow-up email reminding customers of their abandoned cart, potentially with a different offer or message.
10. Analyze Results: Utilize Facebook’s ad analytics to track the performance of your retargeting campaigns. Analyze metrics such as click-through rate (CTR), conversion rate, and return on ad spend (ROAS) to gauge success and identify areas for improvement.
Best Practices for Getting Started
Whether you have experience running ads on Facebook and are just getting started with a new account or you are building out your first campaign, there are some little tips and tricks that can help maximize your chances of success.
1. Understand Your Audience: Before you dive into creating ads, have a clear understanding of who your customers are. Use Facebook’s Audience Insights to learn about their interests, behaviors, and demographics.
2. Set Clear Objectives: What do you want to achieve with your ads? Is it brand awareness, lead generation, or driving sales? Having a clear objective helps in designing campaigns that are geared towards achieving specific goals.
3. Create Compelling Content: Your ad’s content is what captures attention. Use high-quality images or videos, engaging descriptions, and strong calls-to-action (CTAs) to encourage users to click through.
4. Optimize for Mobile: With most users accessing Facebook on mobile devices, ensure your ads and landing pages are optimized for mobile viewing for a seamless shopping experience.
5. Test Everything: From ad creatives to targeting options, test different variations to see what works best. Use A/B testing for a methodical approach.
6. Utilize Facebook Pixel: Implement the Facebook Pixel on your website. It’s critical for tracking conversions and re-targeting visitors who have interacted with your site.
7. Keep Budgets in Mind: Start with a modest budget to test the waters and understand what yields the best ROI. Gradually increase your spend as you become more confident in your ads’ performance.
8. Leverage E-Commerce Specific Features: Use features designed for e-commerce like Dynamic Product Ads (DPAs), collection ads, and shopping campaigns to showcase your products effectively.
9. Pay Attention to Customer Journeys: Structure your campaigns based on where the customer is in the buying process. Use different ad types and messaging for awareness, consideration, and conversion stages.
10. Stay Updated on Facebook’s Changes: Facebook frequently updates its platform and advertising guidelines. Stay informed to ensure your strategies align with the latest best practices.
11. Analyze and Optimize: Regularly check your ad performance metrics. Analyze the data to understand what’s driving your results and make adjustments to optimize for better performance.
12. Keep the Shopping Experience Seamless: Ensure that the transition from ad to website is smooth. Any friction during the shopping experience can lead to drop-offs and lost sales.
13. Focus on Customer Retention: Don’t just focus on acquiring new customers. Use Facebook ads to engage and retain existing customers by targeting them with new products, deals, and content.
14. Use Retargeting Strategically: Retarget visitors who have interacted with your brand but haven’t converted. Tailor messages based on their interactions and preferences.
15. Comply with Policies: Ensure your ads comply with Facebook’s advertising policies to avoid having your ads rejected or your account penalized.
Closing Thoughts
From pinpoint audience targeting to interactive ad formats that showcase your products in the best light, Facebook is an indispensable tool in your e-commerce arsenal.
However, harnessing its full potential requires a keen understanding of the platform’s nuances and a strategic approach to campaign creation and management. Whether you’re a seasoned marketer adjusting to the latest Facebook trends or a newcomer setting up your first campaign, remember that the journey to Facebook ads mastery is a continual learning process.
If you’re looking to supercharge your e-commerce business with tailored Facebook advertising strategies, or if the maze of pixels, catalogs, and retargeting campaigns seems daunting, we’ve got your back. Unlock the potential of your business with a free marketing plan that sets you up for success. Our experts are adept at crafting plans that resonate with your brand voice, engage your target audience, and drive conversions.
